
How to Create a Custom Connector to Convert Calendars from Gregorian to other Calendars in Power Apps
In this article we will learn how to create a Custom Connector to convert Gregorian calendar to other calendars such as Persian, Hijri, Julian, French, etc. by using a REST API in Power Apps.
Introduction to Power Apps Connectors
Power Apps connectors act as bridges between your app and external systems, enabling data exchange and functionality integration. With custom connectors, you can extend Power Apps’ capabilities and connect to any RESTful API, web service, or even proprietary systems. Creating a custom connector allows you to define the schema, authentication, actions, and triggers specific to the service you want to integrate.
Why Should You Use Custom Connectors?
Using custom connectors in Power Apps offers several advantages. Firstly, it allows you to integrate with services that don’t have pre-built connectors available. Secondly, custom connectors enable you to encapsulate complex API calls and business logic, simplifying the app development process. Additionally, custom connectors enhance reusability as you can share them across multiple Power Apps or with other developers.
Requirements
Before diving into the technical aspects of creating a custom connector, it’s crucial to have a clear understanding of the API or service you want to integrate. Familiarize yourself with the API documentation and gather the necessary details such as authentication methods, endpoints, and parameters. Having a good grasp of the requirements will make the connector creation process more efficient.
Prerequisites
Before you begin creating a custom connector, make sure you have the following:
- A Power Apps environment with sufficient permissions to create connectors.
- Access to the documentation or API specifications of the service you want to connect to. (In this article we will create a custom connector to connect to “Calendar Converter API” in RapidAPI.com. So, you need to create a free account in RapidAPI.com to get the require information such as authentication key for the API connection)
Steps to Create a Custom Connector
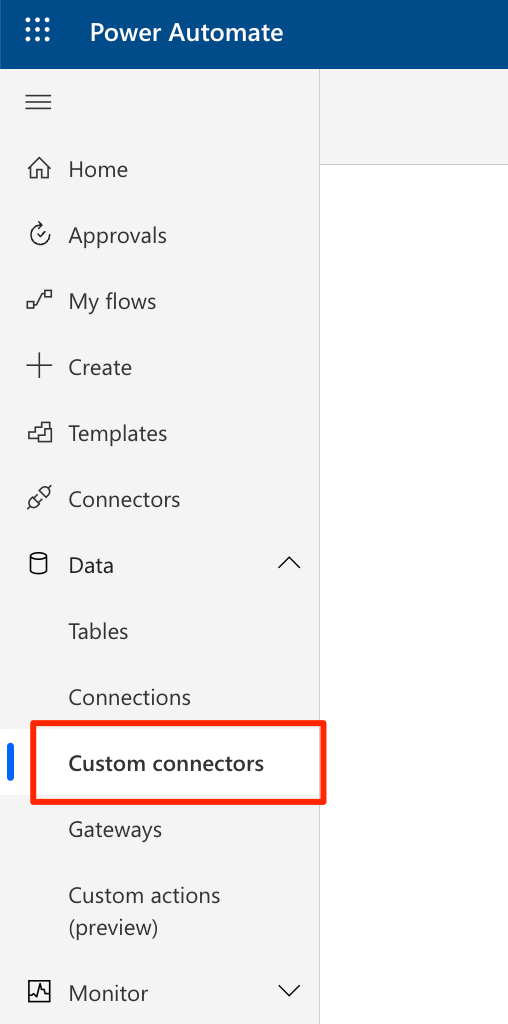
Log in to the Power Apps portal using your credentials. Navigate to the desired environment where you want to create the custom connector. On the left-hand navigation menu, click on “Custom connectors” :
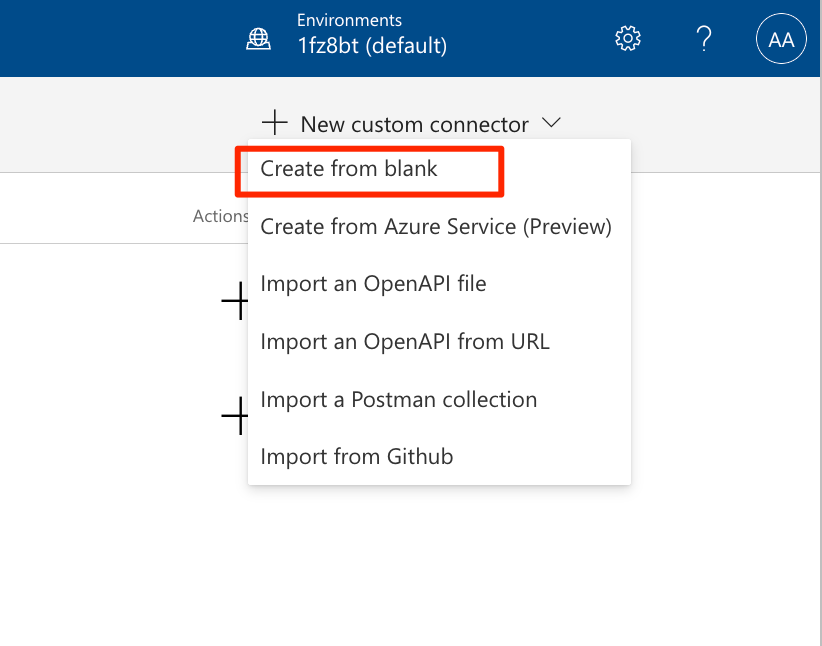
Within the “Custom connectors” section, click on the “New custom connector” button at top right of the page. A dialog box will appear with six options. For this scenario, let’s select “Create from blank“
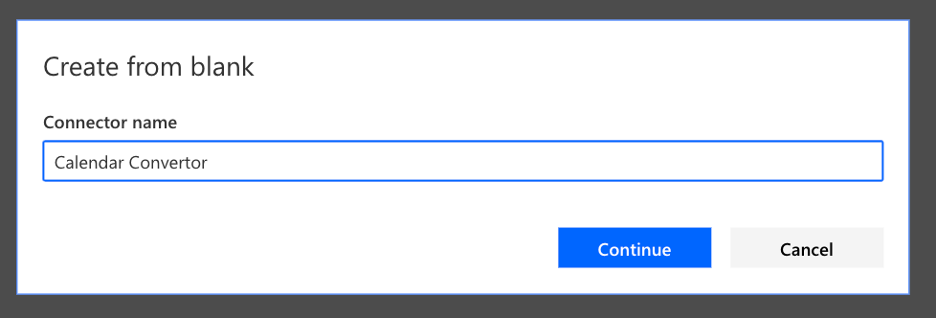
Give your custom connector a unique and descriptive name in opened dialog, then click on Continue button:
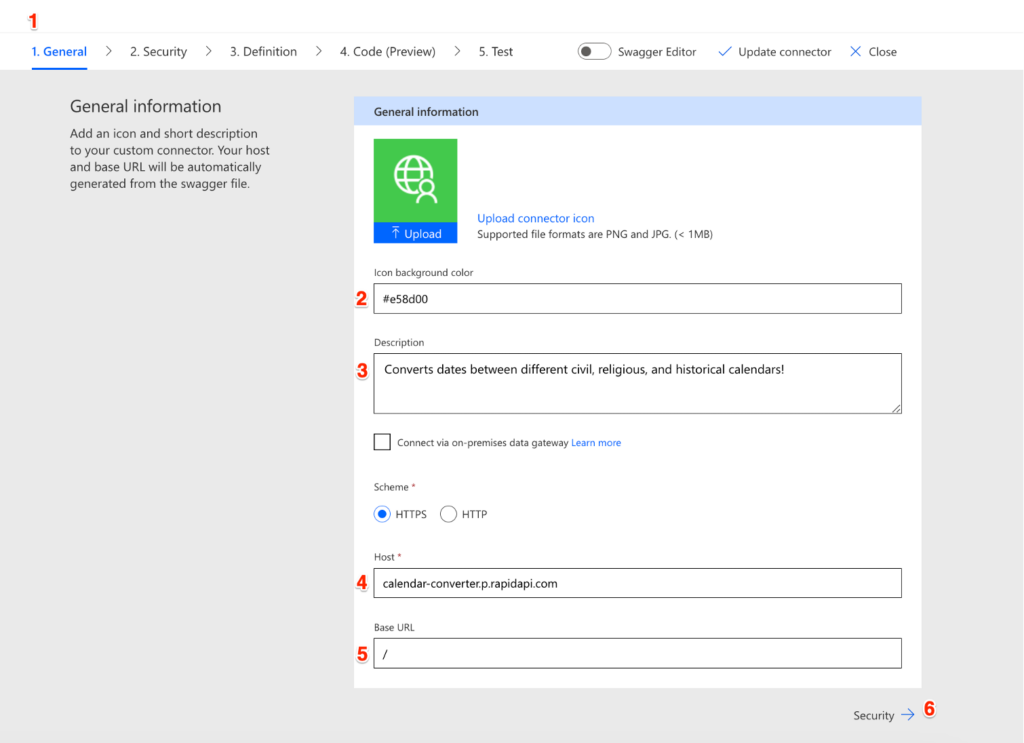
Next, In the “General” tab of the custom connector editor, provide the following details, then click on the Security button.:
Scheme: HTTPS
Host: calendar-converter.p.rapidapi.com
Base URL: /
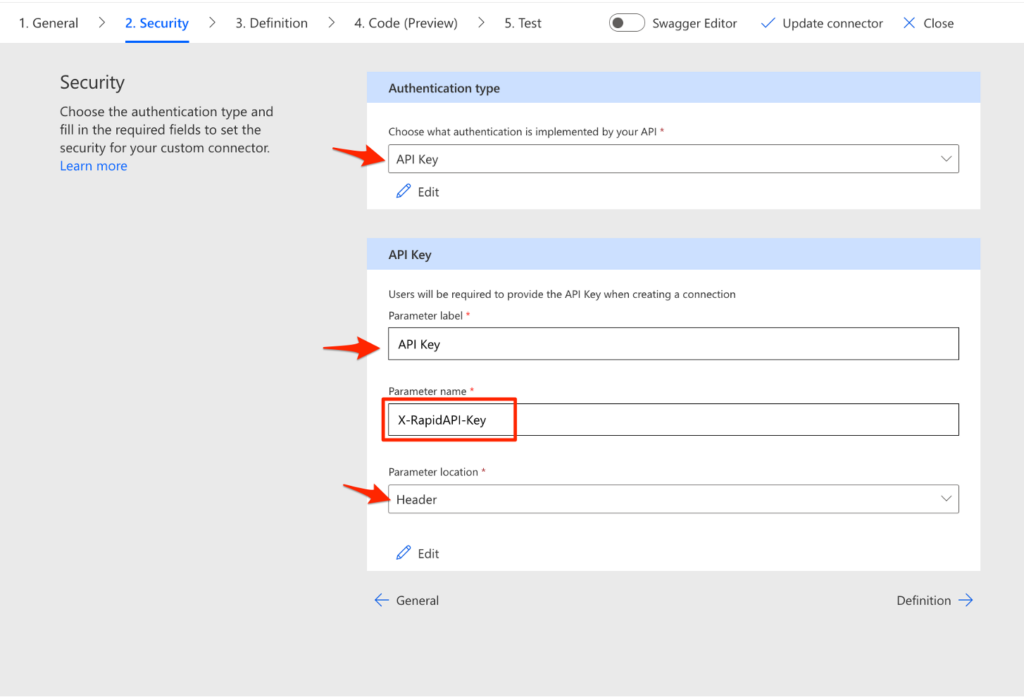
In the “Security” tab, you need to specify the authentication requirements for your connector. This depends on the authentication mechanism used by the API you are integrating. For this scenario, select “API key” from Authentication Type dropdown then fill in the API section with these values:
Parameter Label: API Key
Parameter Name: X-RapidAPI-Key
Parameter Location: Header
In the “Definition” tab of the custom connector, you can define the Actions and Triggers for your custom connector. Actions represent the various operations or endpoints exposed by the API, while triggers allow your Power Apps application to respond to events triggered by the API.
First click on “New action” to create individual action, then fill-in Summary, Description and Operation ID in the General section as follows:
Summary: Convert Date
Description: Convert Gregorian calendar to other regions calendar.
Operation ID: ConvertDate
The summary and description will be shown in Power Automate to identify the action, while the Operation ID will be used in Power Apps as a method.
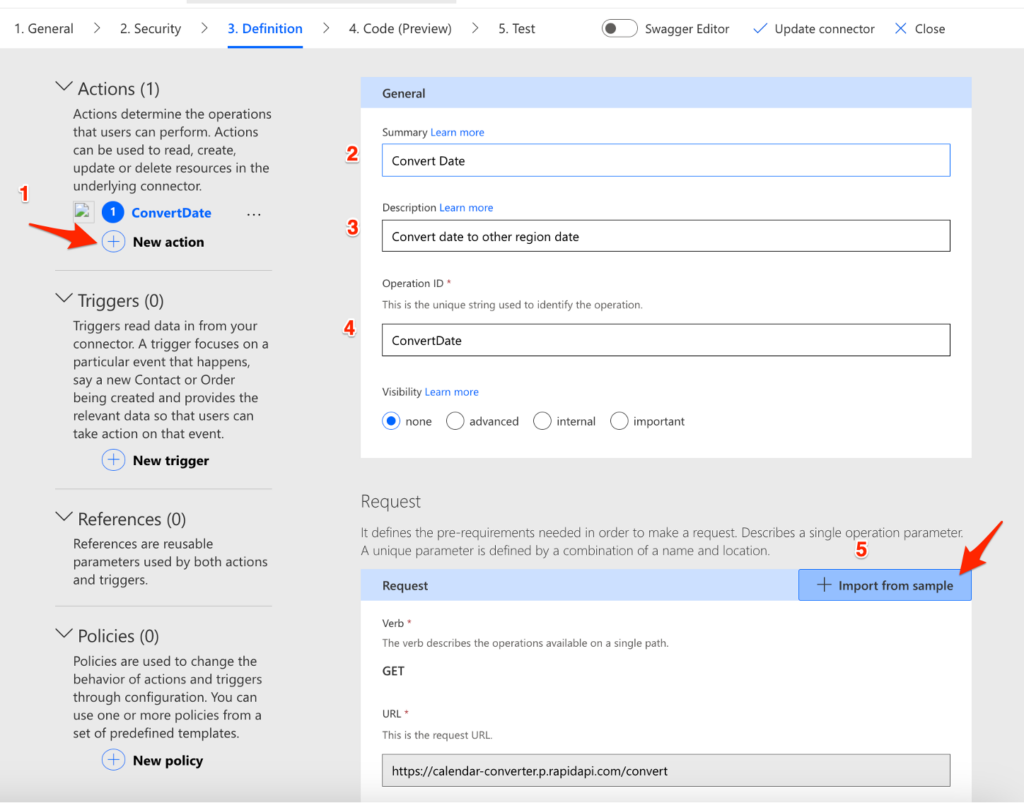
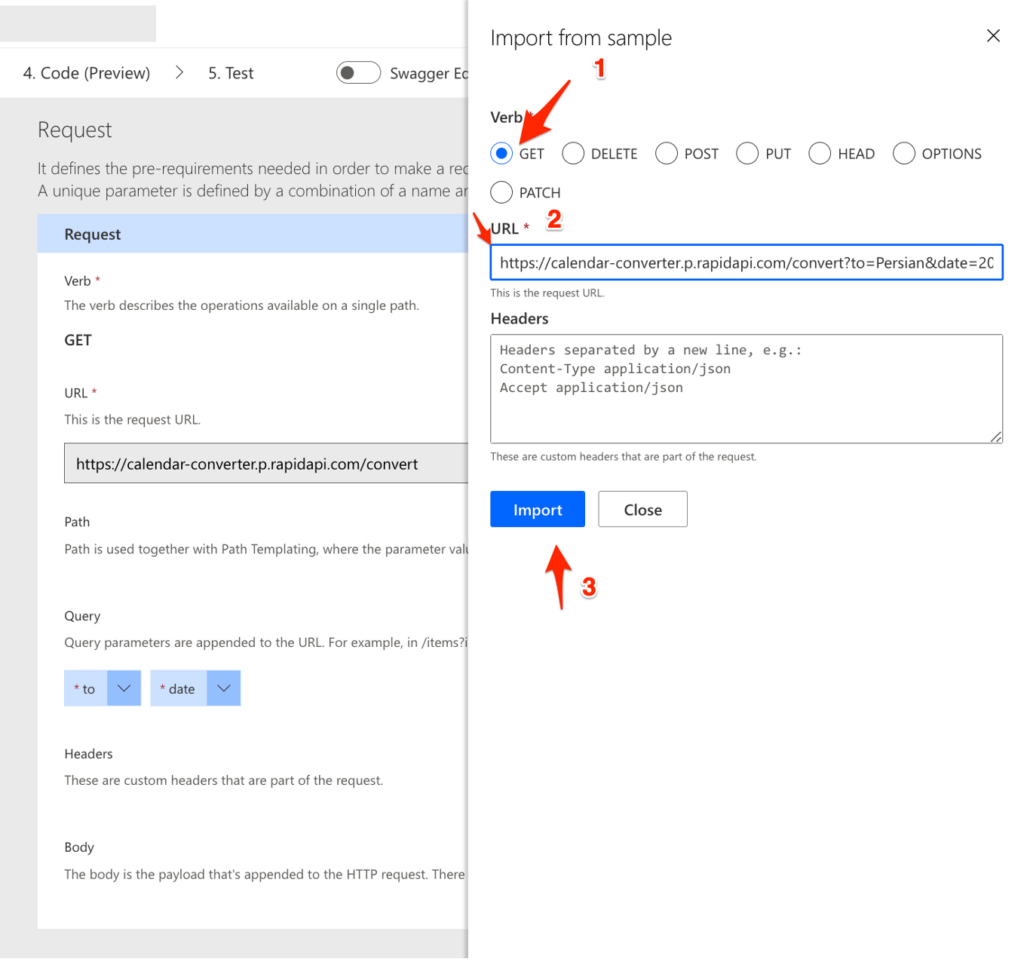
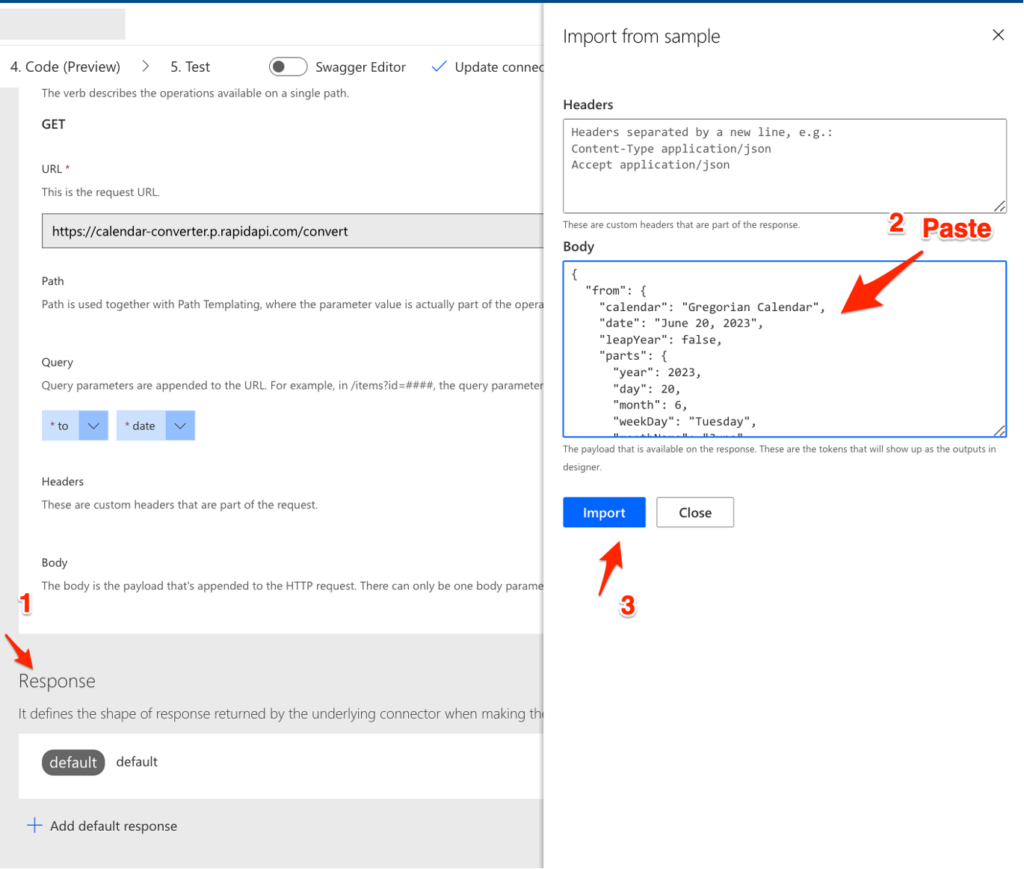
Let’s continue with Request section. Click on “Import from Sample” button.
Fill-in the form with following values, then click on “Import” button :
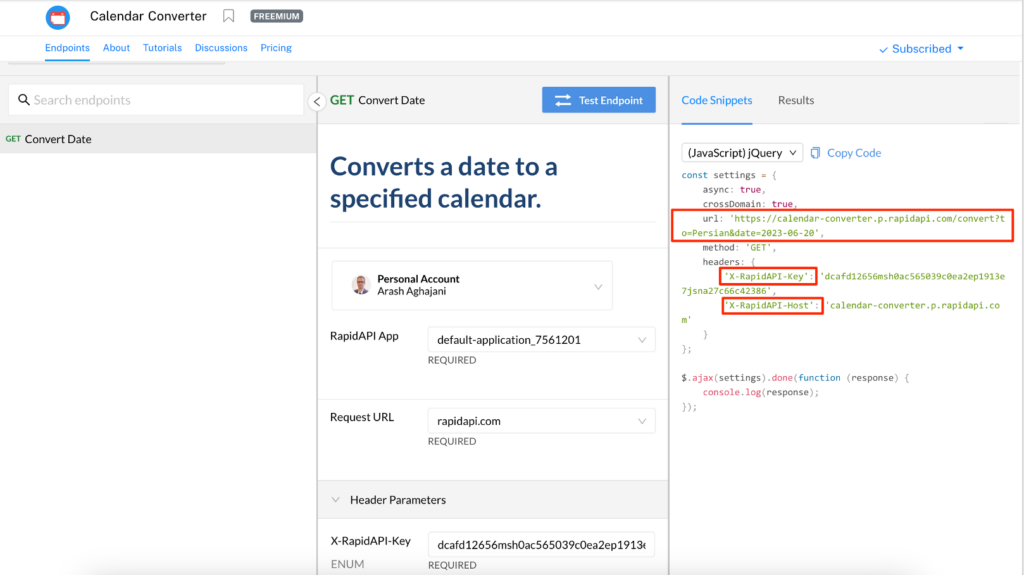
Verb: GET (Because We want to use the Converter API to query and retrieve data, so we choose GET request.)
URL: https://calendar-converter.p.rapidapi.com/convert?to=Persian&date=2023-06-20 (Copy this URL from the API endpoint Code Snippet panel as shown below)
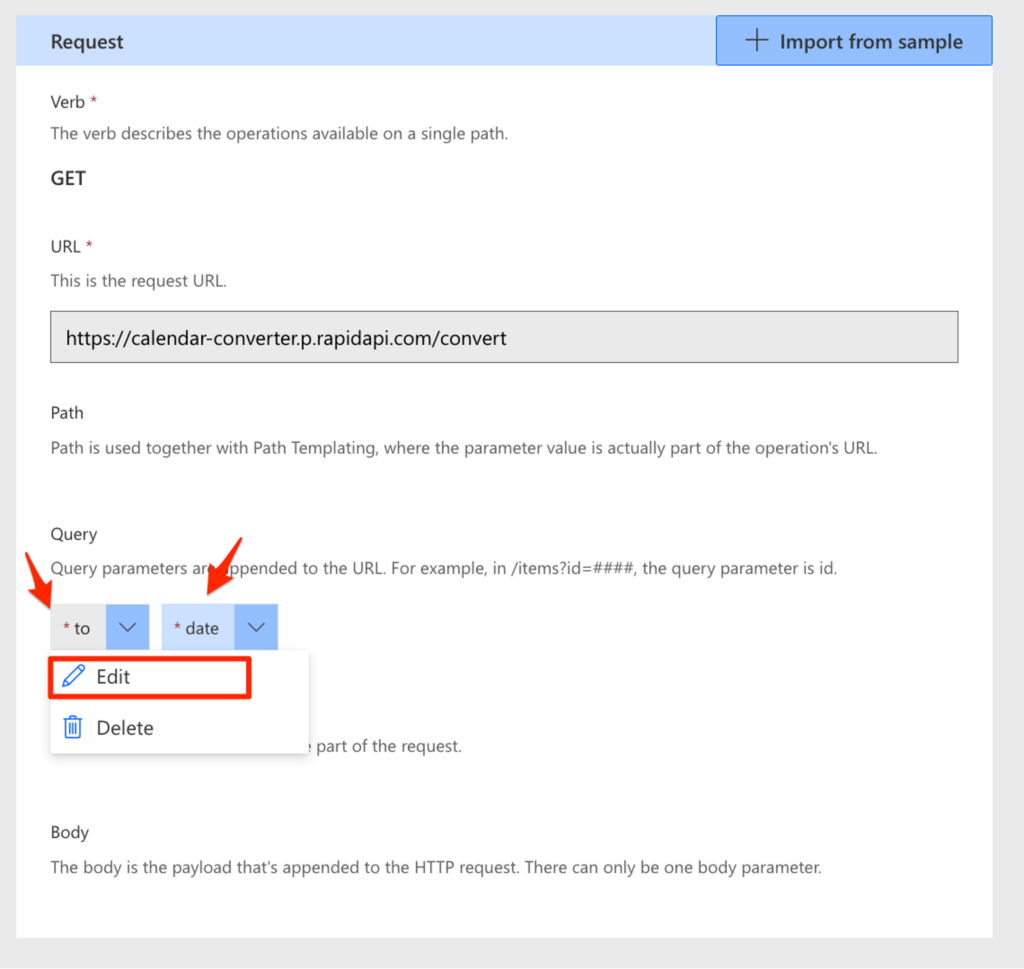
After we import the sample URL, the Query parameters will be set by Query Strings in Request section. So, we need to setup each of the parameters. The parameters for the converter API are “to” and “date”.
Click on “to” parameter and choose Edit from the context menu to config the parameter.
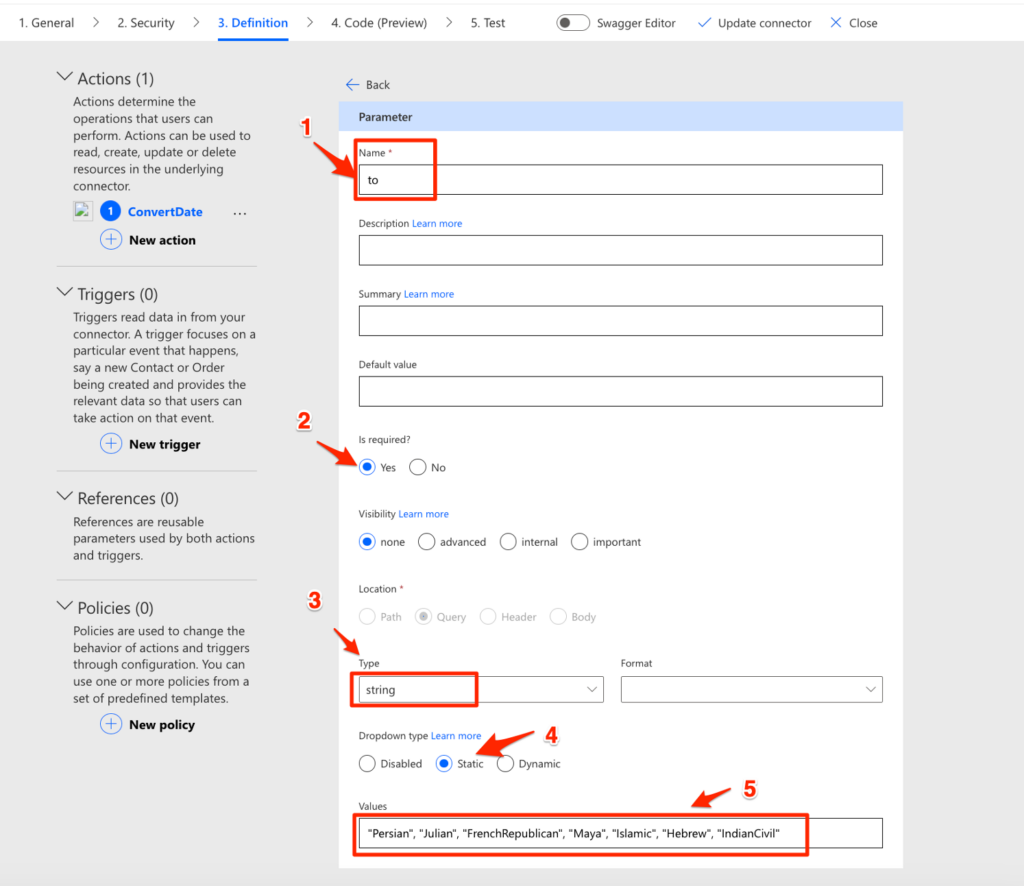
Change the “Is required” setting to “Yes”. Set the “Type” as “String”, set the “dropdown type” to “Static” and fill the “Values” with :
“Persian”, “Julian”, “FrenchRepublican”, “Maya”, “Islamic”, “Hebrew”, “IndianCivil”.
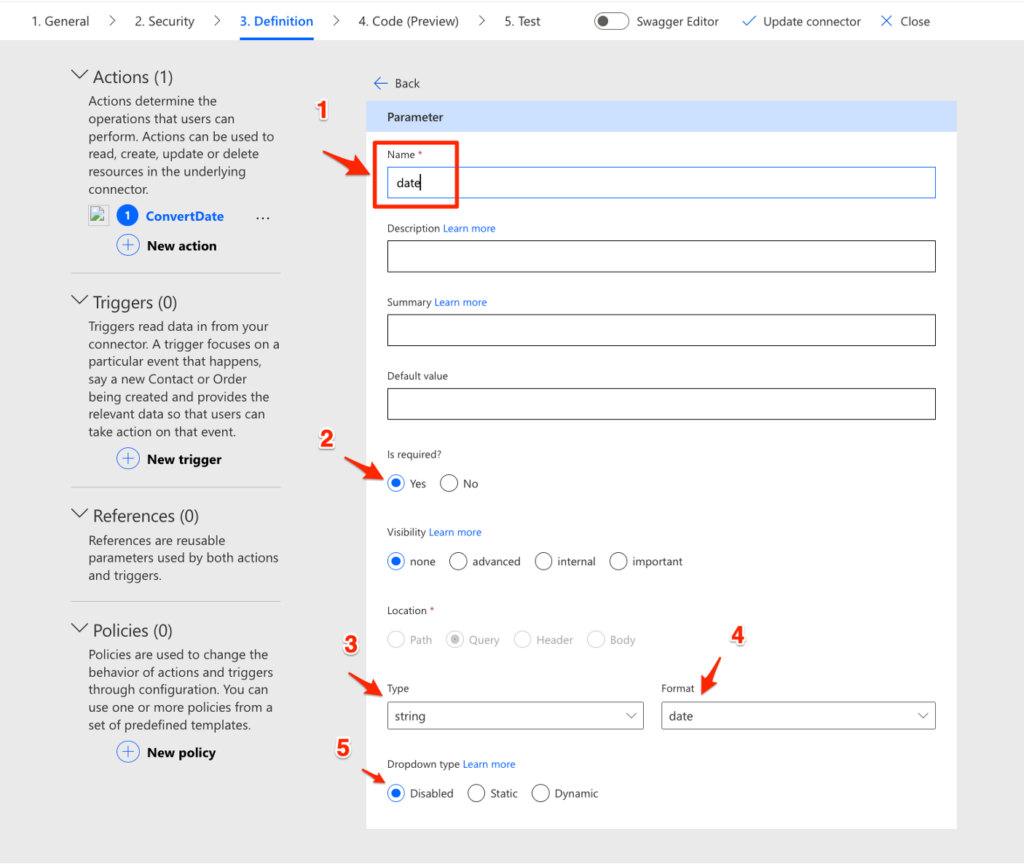
Go back to the Request section and edit the “date” parameter as follows:
Set “Is required” to “Yes”. Set “Type” to “String” and “Format” to “date” and the “DropDown type” to “Disabled”.
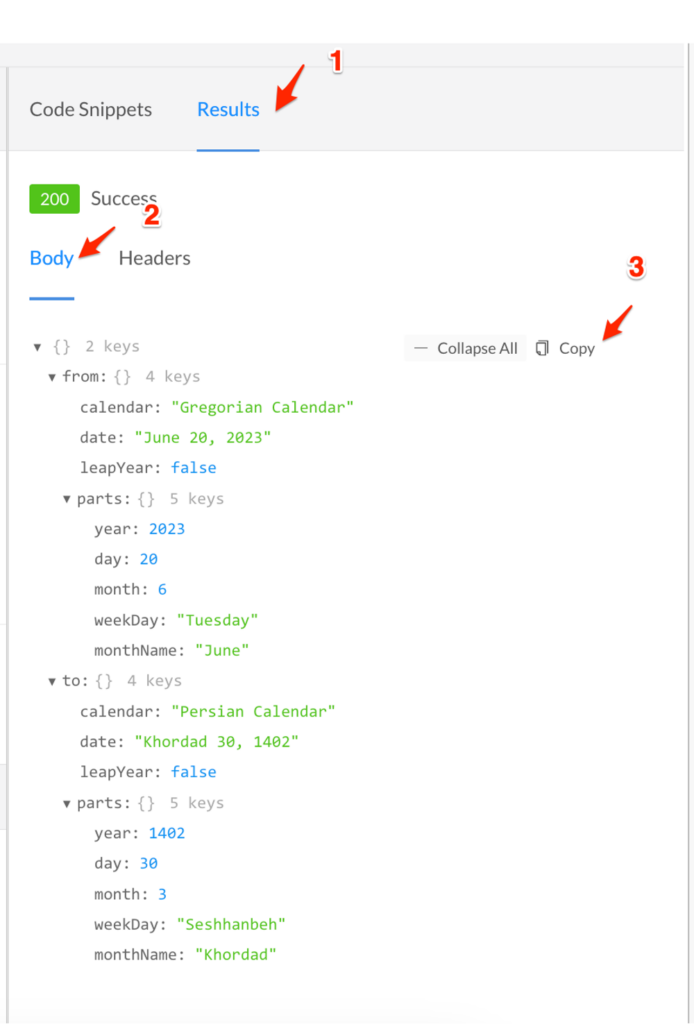
Well! We defined the API Request parameters and structure. Now we are going to define the API Responsestructure. The last section in definition tab is Response, So click on the “Add default response” button. Copy a sample of the response JSON from the Converter API in rapidapi.com site as follows and paste it into “Body” text area. Then click the “Import” button.
The sample response should look like this :
{
  "from": {
    "calendar": "Gregorian Calendar",
    "date": "June 20, 2023",
    "leapYear": false,
    "parts": {
      "year": 2023,
      "day": 20,
      "month": 6,
      "weekDay": "Tuesday",
      "monthName": "June"
    }
  },
  "to": {
    "calendar": "Persian Calendar",
    "date": "Khordad 30, 1402",
    "leapYear": false,
    "parts": {
      "year": 1402,
      "day": 30,
      "month": 3,
      "weekDay": "Seshanbeh",
      "monthName": "Khordad"
    }
  }
}
We just completed the definition of API request and response structures. Now we will go to the next tab “Code (Preview)”. In this tab by enabling the Code feature, you can input or upload your custom C# code to transform request and response payloads beyond the scope of policy templates. We don’t need this feature for our scenario but if you would like to learn about how to write the custom code, you can read this article from Microsoft Learn.

Then paste this key to the API key prompt page and click the “Create Connection” button.
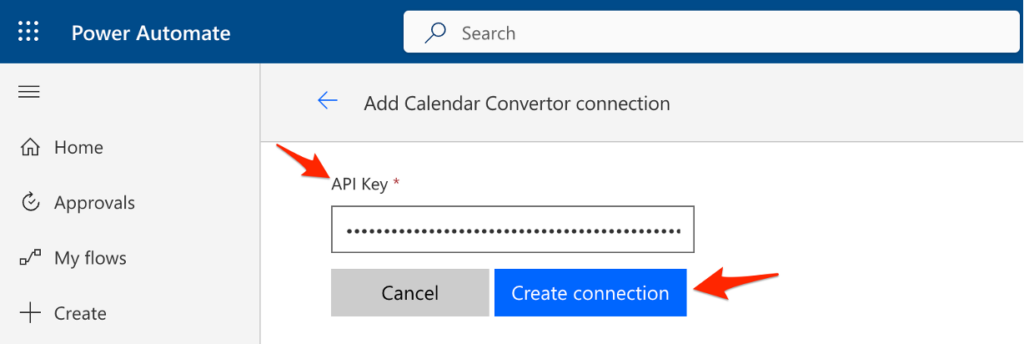
It will add a new record in the selected connection dropdown.
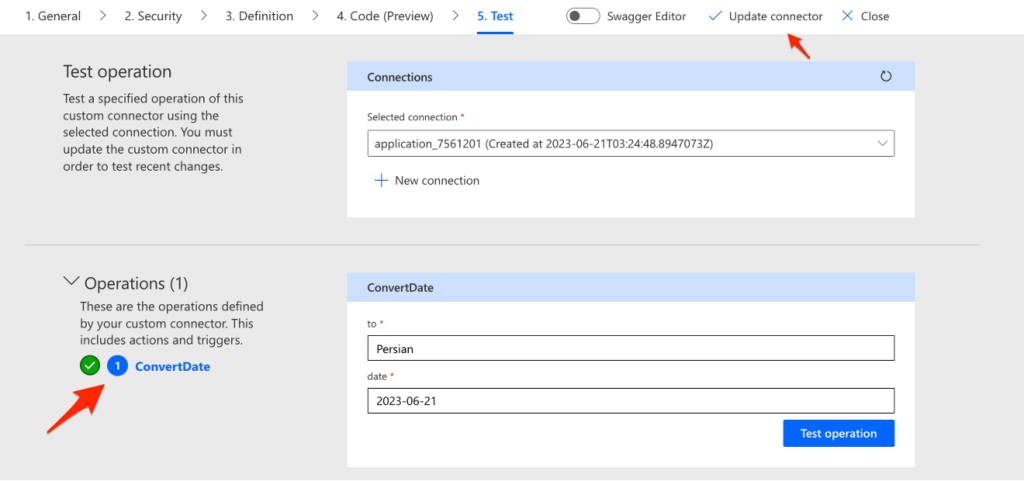
In the “ConvertDate” section we should input values for To and Date parameters as shown in the following image, then click the “Test Operation” button:
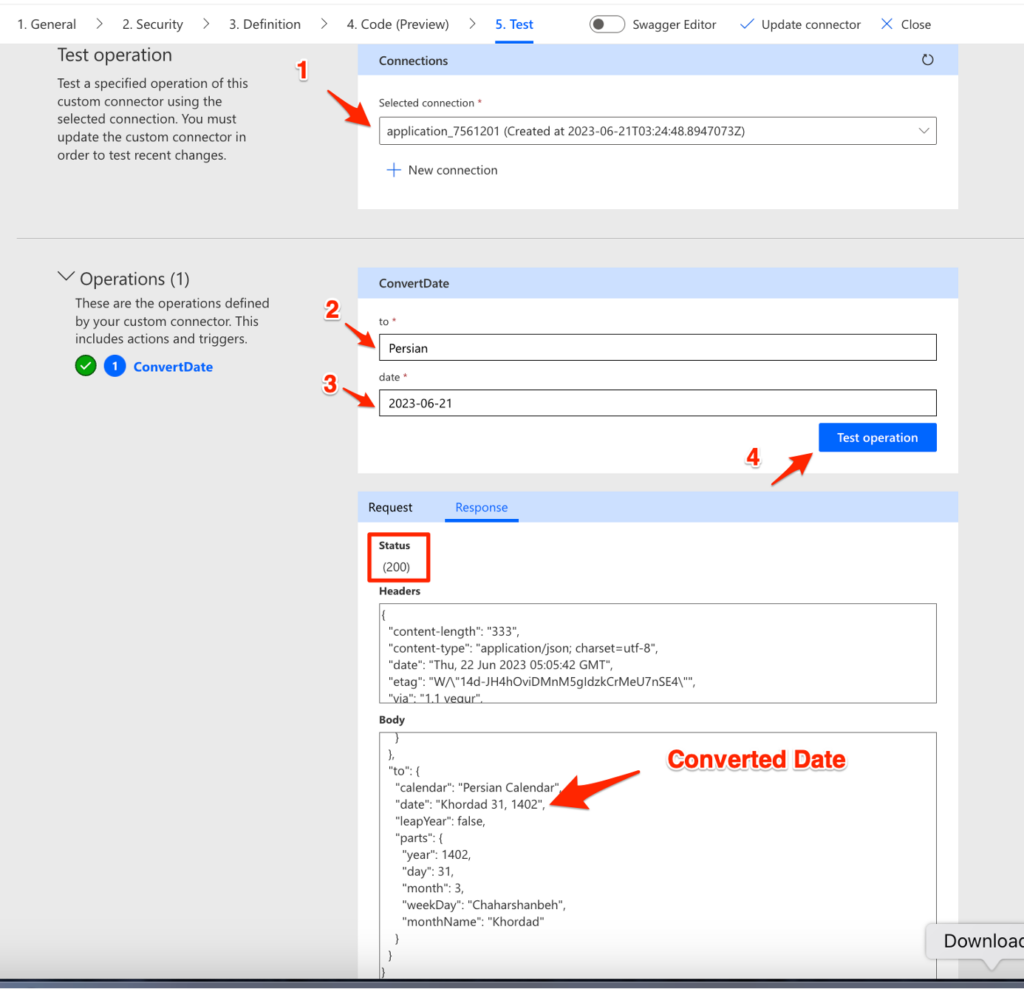
As you can see in above image, the Response Status is (200) and that’s mean the API response is valid without any error. Verify that the response contains the expected data and format by checking the “Body” section values and it will show the converted date in Persian Calendar returned by the API.
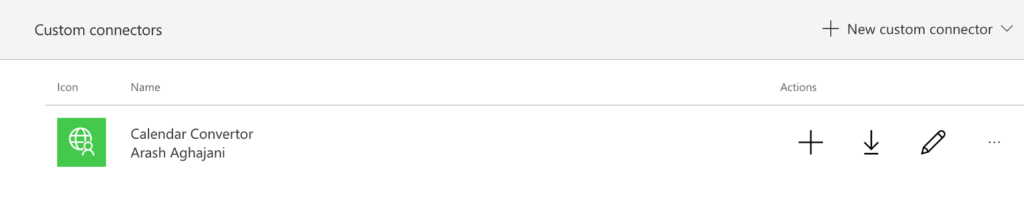
Now, creation of the custom connector is completed, and we can save and update the connector by clicking the “Update Connector” button on top of the page.
If you go back to the Custom Connector page you can see a new connector added to the list :
Steps to use the custom connector in Power Apps
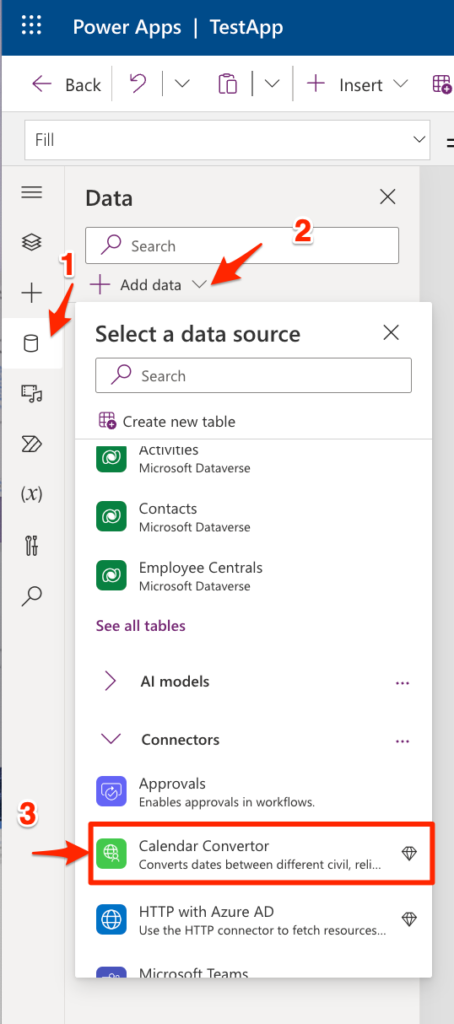
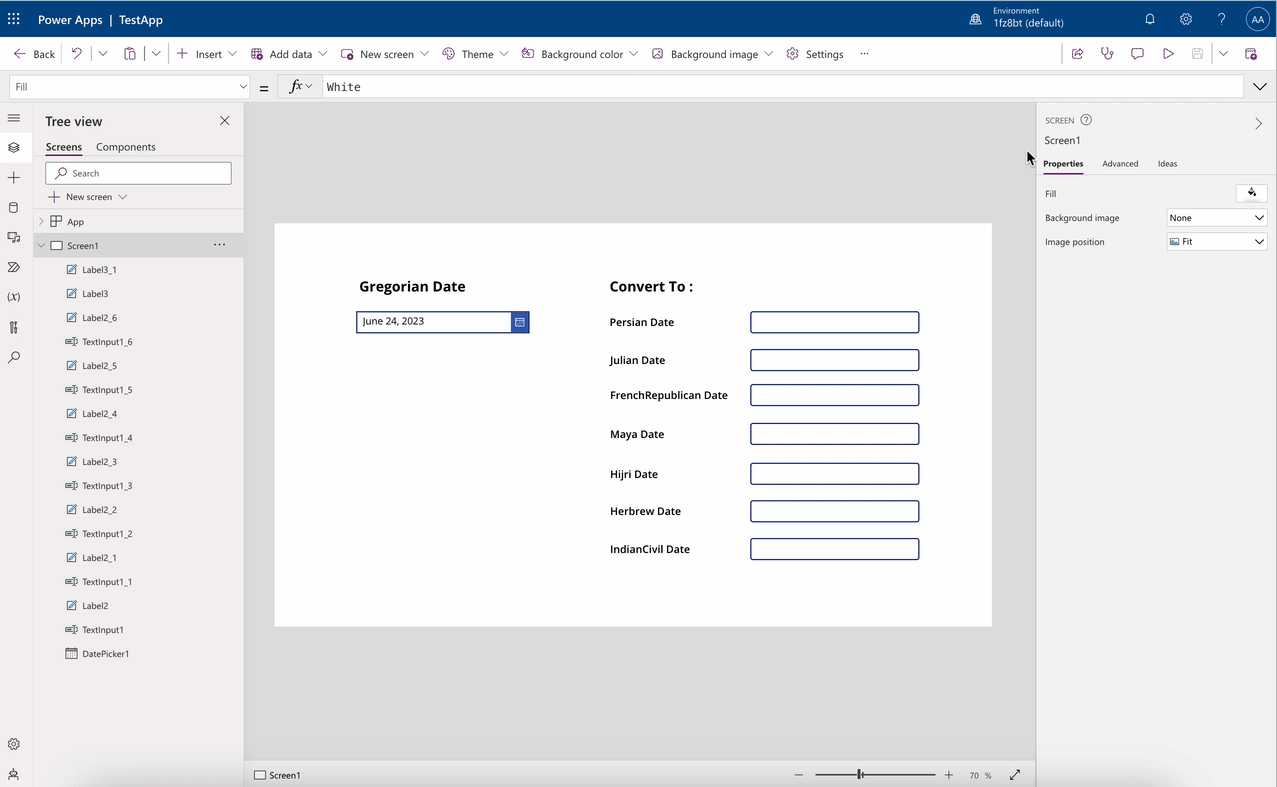
The last step in this article is using the custom connector in Power Apps. So let’s create a blank Power Apps app with a default screen. Then at the left navigation in Data section, choose “Calendar Convertor” connector from the Connection list and add it to the app.
Then on the screen1 add the following controls:
- 1 Date Picker
- 7 Text Inputs
- 7 Labels
Set the Date Picker control properties as follows:
DefaultDate : Today()OnChange property:
Set(
    varSelectedDate,
    Text(
        DateValue(
            DatePicker1.SelectedDate,
            "en-GB"
        ),
        "yyyy-mm-dd"
    )
);
Set(
    varPersianDate,
    CalendarConvertor.ConvertDate(
        "Persian",
        varSelectedDate
    )
);
Set(
    varJulianDate,
    CalendarConvertor.ConvertDate(
        "Julian",
        varSelectedDate
    )
);
Set(
    varFrenchDate,
    CalendarConvertor.ConvertDate(
        "FrenchRepublican",
        varSelectedDate
    )
);
Set(
    varMayaDate,
    CalendarConvertor.ConvertDate(
        "Maya",
        varSelectedDate
    )
);
Set(
    varIslamicDate,
    CalendarConvertor.ConvertDate(
        "Islamic",
        varSelectedDate
    )
);
Set(
    varHerbrewDate,
    CalendarConvertor.ConvertDate(
        "Herbrew",
        varSelectedDate
    )
);
Set(
    varIndianDate,
    CalendarConvertor.ConvertDate(
        "IndianCivil",
        varSelectedDate
    )
);
Set other calendars’ Text input properties as follows:
Default property :
varPersianDate.to.date (for Persian Date TextInput )
varJulianDate.to.date (for Julian Date TextInput)
.
.
.
varIndianDate.to.date (for IndianCivil Date TextInput)
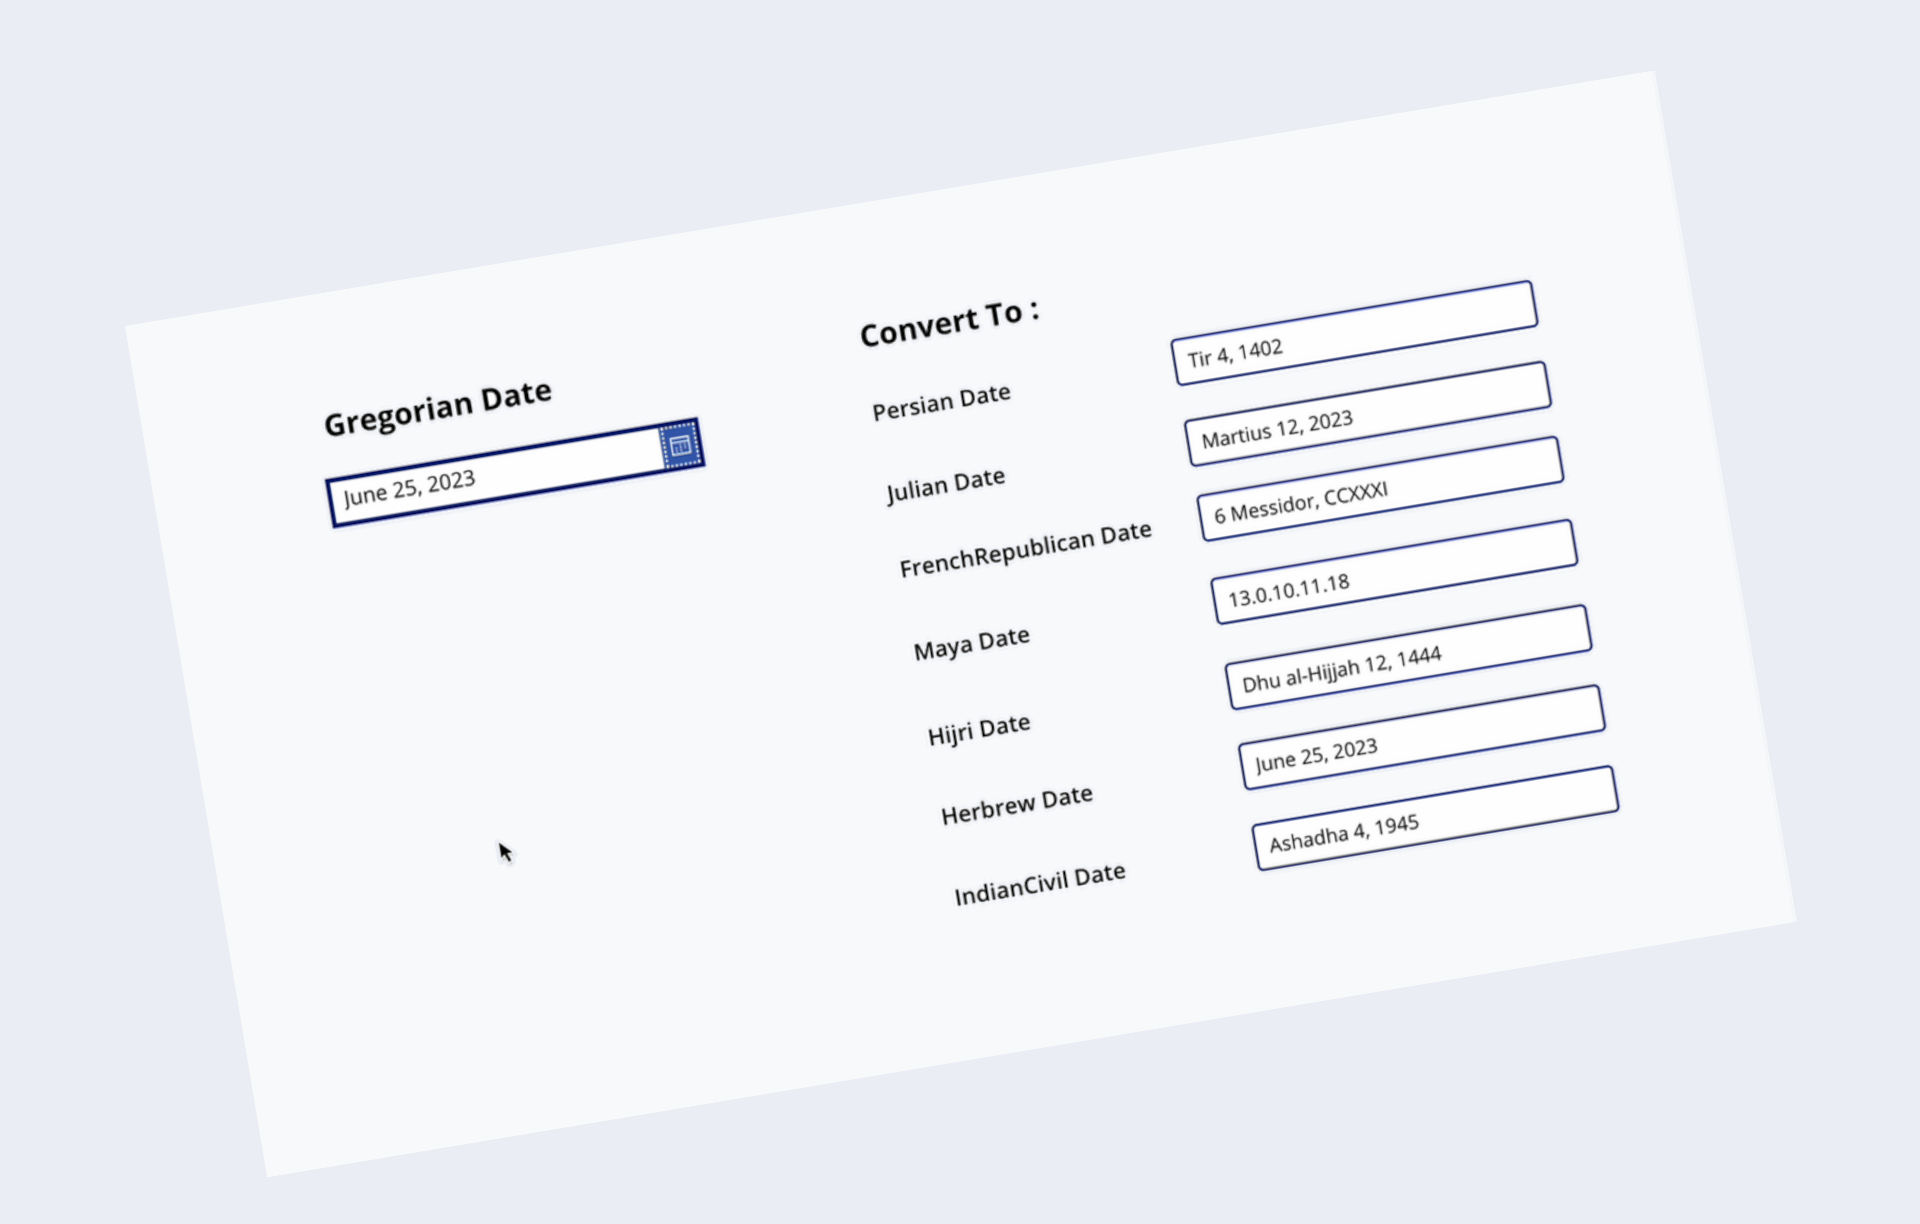
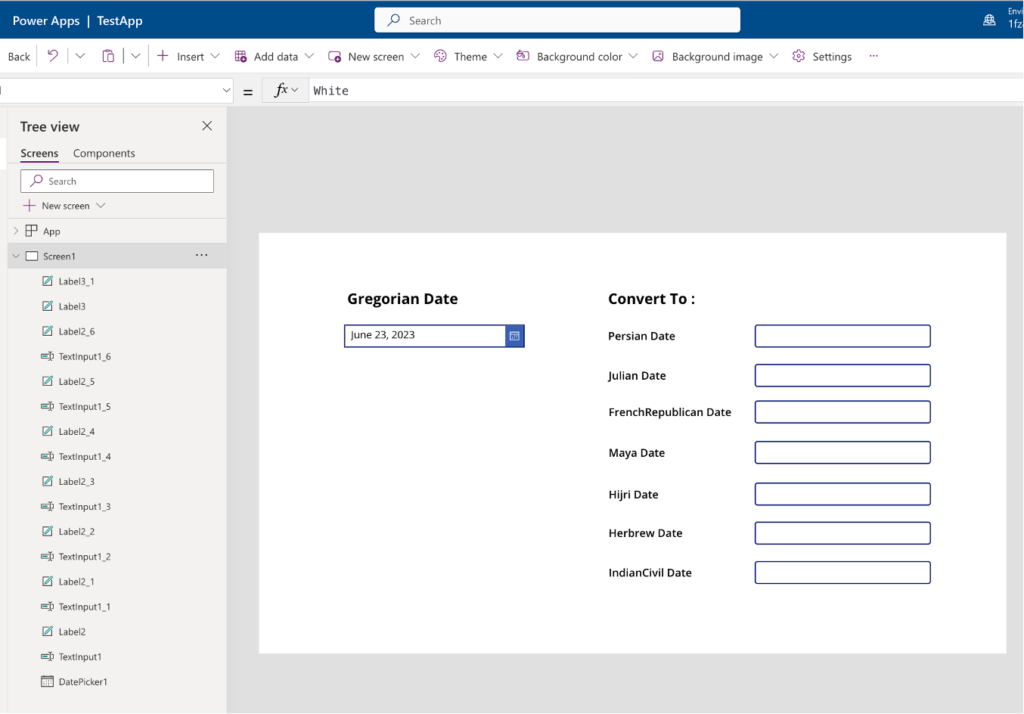
After set the controls properties value, now you can run the app to see the result. Try to select a date from Date Picker for conversion. The result will be something like this:
You can also get other information related to the destination calendar after conversion by API from the service response. This information for the example above and the Persian calendar can include the following:
- calendar:”Persian Calendar”
- date:”Tir 4, 1402″
- leapYear:false
- year:1402
- day:4
- month:4
- weekDay:”Yekshanbeh”
- monthName:”Tir”
In fact, I have never seen a method to convert dates from Gregorian to other calendars in Power Apps. I think this method, which means using a custom connector and calling an external API, is a good method to use in projects that need convert date to other calendars. Of course, these APIs also require the purchase of a license for use in production environments.
App Source: this sample app source is available for download from my GitHub repository.