
A Practical Scenario on How to Call a Flow from another Flow in Power Automate
In this post, I am going to explain a practical scenario includes calling one flow from another flow, formatting column, filing a Word template and converting a file to PDF using Power Automate.
Scenario:
Our client has an on-premises SharePoint marketing site and wants to migrate it to SharePoint Online. The challenging part of this migration was the Requests list. Because they designed the form with InfoPath and inside this form, there was a print button that used SSRS (SQL Server Reporting Service) to create a report from the list item data. By clicking on this button, the user received and printed the report.
Solution:
Using the Sharegate migration tool, I moved the content of the website to SharePoint Online. As SSRS is not compatible with SharePoint Online, I opted to utilize Power Automate to generate a PDF format report, which the user can then access, view and print. Also, in order to provide the possibility of creating a report template for the site owners and to be able to design the report template as they want, I used the “Populate a Microsoft Word Template” action in Power Automate, which puts the list information in a Word file template stored in the SharePoint library and creates a report in Word(docx) file format. Finally, I convert this file to PDF with another action. The important thing is that this action requires a Premium license.
Before implementing this solution, we must pay attention to the following:
- In order for the user to be able to run the flow by clicking on each item and finally get the print file, we use Column Formatting in the Requests List.
- In order to be able to create the item’s print format based on a template predefined by the user, we use the “Populate Word Template” action in the Power Automate flow. This action requires a Premium license.
- We will make use of a premium licensed service account.
- Because this flow includes a Premium action, therefore, if any user on the site wants to trigger it, the user account must also have a Premium license. So, this will cause a lot of cost for the organization. To solve this problem, I utilized an initial flow (Parent) without Premium action that a regular user account will run. This flow will then trigger the second flow (Child) containing the Premium action, which the Service Account will execute. In this way, you only need to have Premium license for the Service Account.
- Because we have plan to call a flow from another flow in Power Automate, we need to use “Run a Child flow” action in Parent flow. So, Power Automate support this action only in Solution and we should implement our flows through solutions in Power Platform.
So, let’s start with implementation:
- I have created a list with several columns regarding to business needs. I also added two extra “Single line of text” columns, named “Print Flow” and “Print File”. I modified the Column Formatting JSON code for the Print Flow as below:
{
  "$schema": "https://developer.microsoft.com/json-schemas/sp/column-formatting.schema.json",
  "elmType": "span",
  "style": {
    "color": "#0078d7"
  },
  "children": [
    {
      "elmType": "span",
      "attributes": {
        "iconName": "Flow"
      }
    },
    {
      "elmType": "button",
      "style": {
        "border": "none",
        "background-color": "transParent",
        "color": "#0078d7",
        "cursor": "pointer"
      },
      "txtContent": "Generate Report",
      "customRowAction": {
        "action": "executeFlow",
        "actionParams": "{\"id\": \"fb002c47-3649-4a02-b247-8a4c45cdaaba\"}"
      }
    }
  ]
}
Note: You need to replace the actionParams value with the Initial (Parent) flow ID.
I also modified the Column Formatting JSON code for the “Print File” column as below:
{
  "$schema": "https://developer.microsoft.com/json-schemas/sp/column-formatting.schema.json",
  "elmType": "span",
  "style": {
    "color": "#0078d7"
  },
  "children": [
    {
      "elmType": "span",
      "style": {
        "display": "=if(@currentField != '', 'block', 'none')"
      },
      "attributes": {
        "iconName": "Print"
      }
    },
    {
      "elmType": "a",
      "attributes": {
        "href": "@currentField",
        "target": "_blank"
      },
      "txtContent": "Generated!",
      "style": {
        "display": "=if(@currentField != '', 'block', 'none')",
        "text-decoration": "none",
        "padding": "5px"
      }
    }
  ]
}
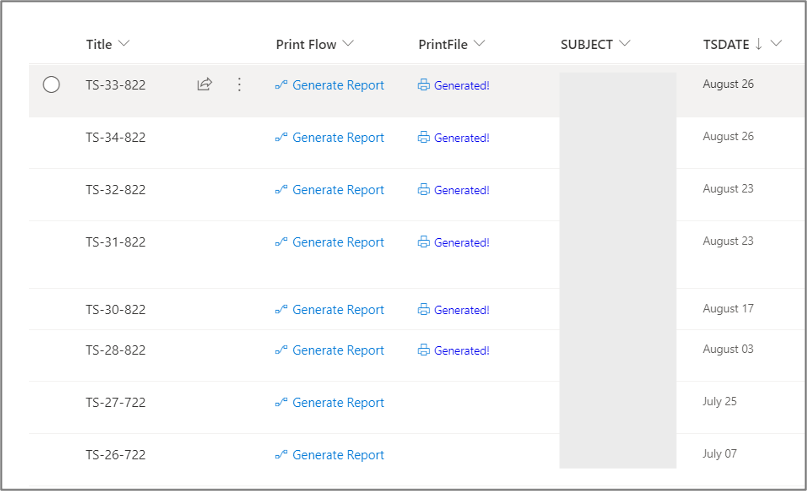
And the result should look something like the image below:
So, let’s continue with implementing flows:
After logging in to your Microsoft 365 tenant, open make.powerautomate.com and in the left navigation menu click on “Solutions” then click on “New Solution” button on the top menu. It will open a New Solution panel. and fill out the required fields (Display name, Name, Publisher, and Version) with your desired values. Your solution will be created in a minute.
By clicking on solution name, you will redirect to a new page, and you can add new items to your solution.
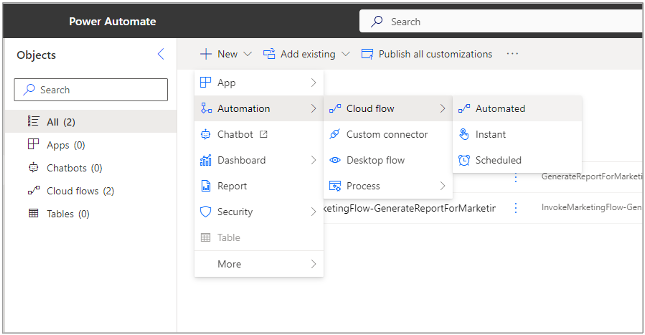
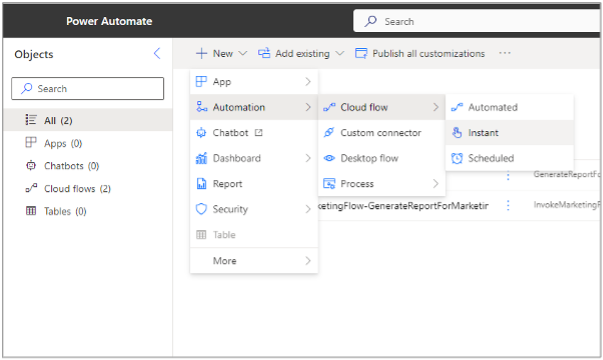
Creating the Child flow first is necessary as we require it to pass information to the Parent flow, So Click on New > Automation > Cloud Flow > Automated. (Below image)
In popup dialog, select “When an Http request is received” from “Choose how to trigger this flow“ list, then press “Create” button. It will open flow designer page. (Please note the service account should have assigned Premium license, if your account doesn’t have, so you will get 90 days trial subscription message)
Let’s config the first action, you can’t change the “HTTP POST URL” field. Flow will automatically populate it once the flow is saved.
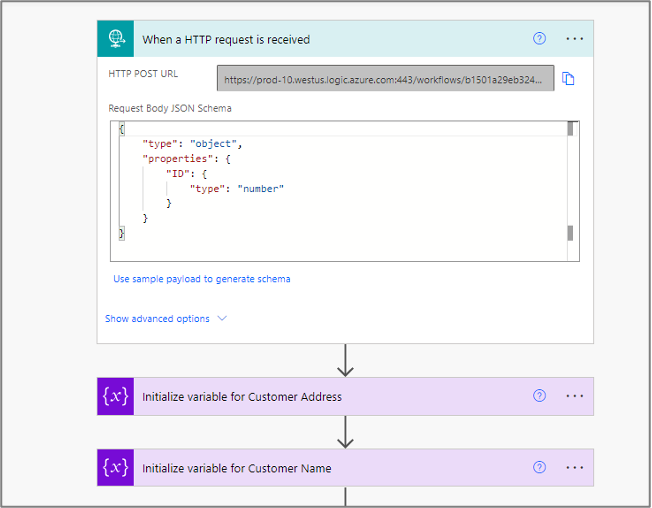
We need to fill “Request Body JSON Schema” with correct code. According to the scenario, I want to print current item which selected by user, So I need to pass the item ID to Child flow to get item’s data. So I added ID as only properties in my JSON code as follows:
{
  "type": "object",
  "properties": {
    "ID":{
      "type":"number"
    }
  }
}
Now we can continue to add other actions. Explaining all of them in this post will take time and I will only mention the important actions that we need to use in this scenario.In the image below, you can see all the actions that I used in the Child flow:
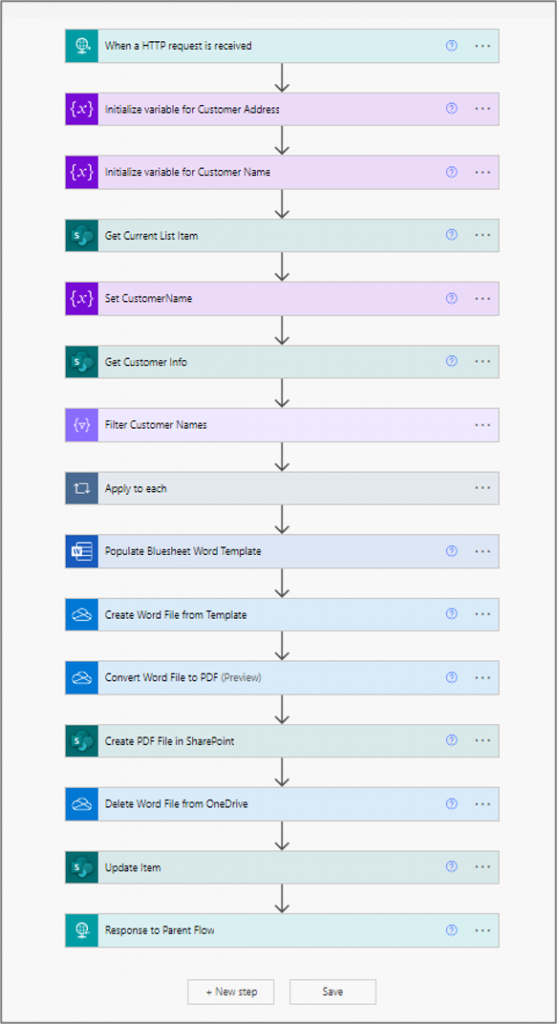
As you can see, in this flow I used “Populate a Word Template” Premium action. It will fill out all fields in my Word Template (that I uploaded to a SharePoint library) with selected list item data.
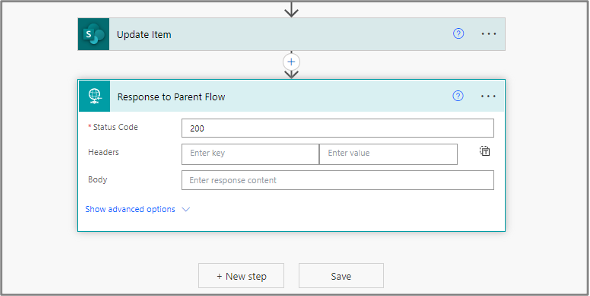
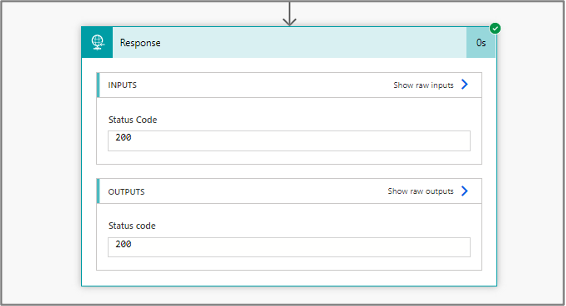
At the end of the flow, you must use “HTTP Response” action. This action sends the value 200 to the Parent flow if the process has been completed correctly, which means that the HTTP call was successful.
Well, the Child flow is completed. Save the flow and return to the solution page.
Now, we are going to create a second flow for the Parent (Initial Flow).
Click on New > Automation > Cloud Flow > Instant. (Below image)
Note: We selected Instant flow type for Parent flow because we need to trigger it manually by user.
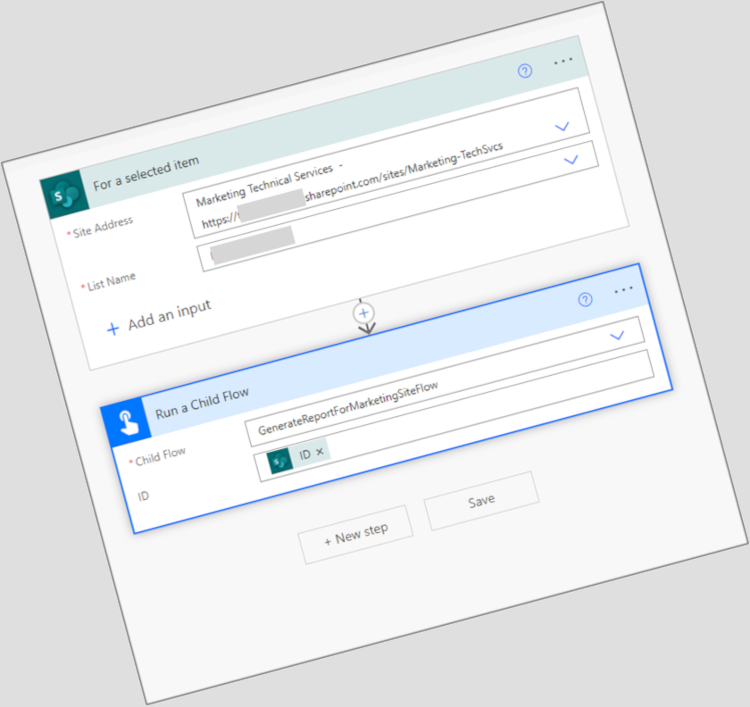
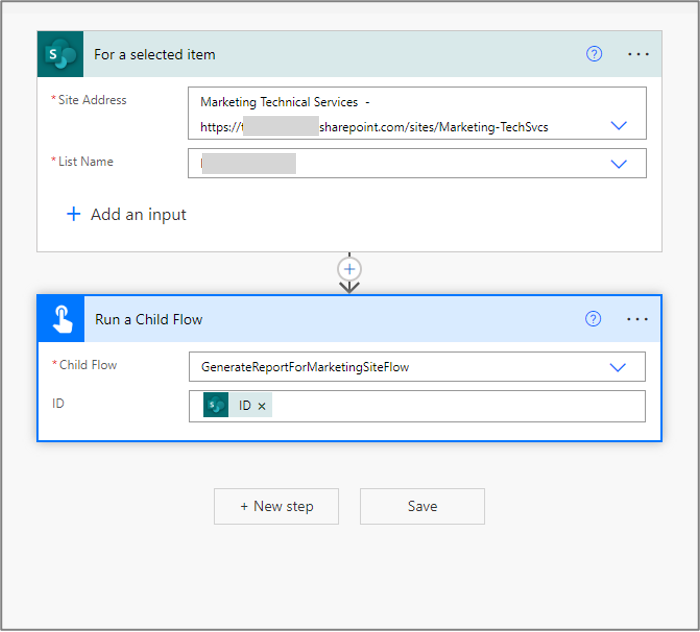
In popup dialog, select “For a Selected Item” from “Choose how to trigger this flow“ list, then press Create button. It will open flow designer page.
In the flow designer page, fill the “Site Address” and “List Name” boxes with correct values.
Then add a “Run a Child flow” action. Select your Child flow name from Child flow dropdown, then the action will show you the ID field that we defined in the JSON schema, fill this filed by using Dynamic Content menu and select ID.
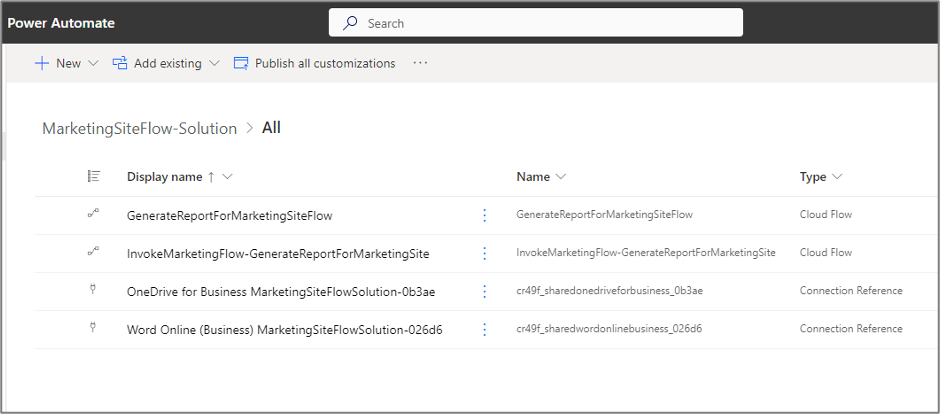
Well, saves the Child flow and go back to the solution page. You will see a list of two flows plus other connections that might you had in your flows.
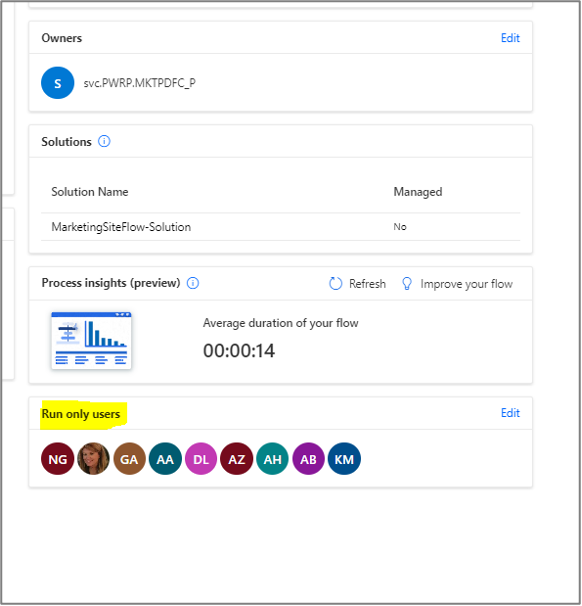
The flows implementation was finished and are ready to test. But before testing the flows, we have to do another important thing, and that is giving access to users to run the Parent flow. To do this, select the Parent flow from the solutions page and on the right side of the flow setting page, in section “Run Only Users”, add the people you want to have access to run/start the flow.
After doing this setting, you can test the workflows. First, select an item from the requests list and then click on the “Generate Flow” button in “Print Flow” column. The flow panel will open, and you can run the Paren flow by pressing the “Run Flow” button :

The process will complete in a few seconds and display “Generated!” in the Print File column. The user can access and print the PDF file by clicking on it.
Now let’s check the log of the parent process.
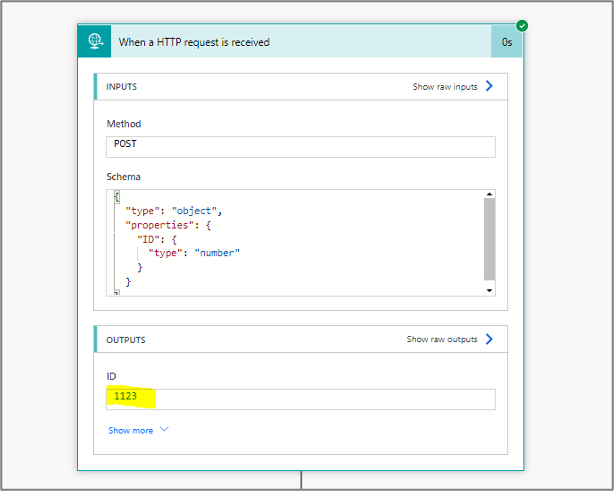
The image below demonstrates that I executed the flow on an item with an ID of 1123. Consequently, this ID is transmitted to the (second) Child flow from the Parent flow:
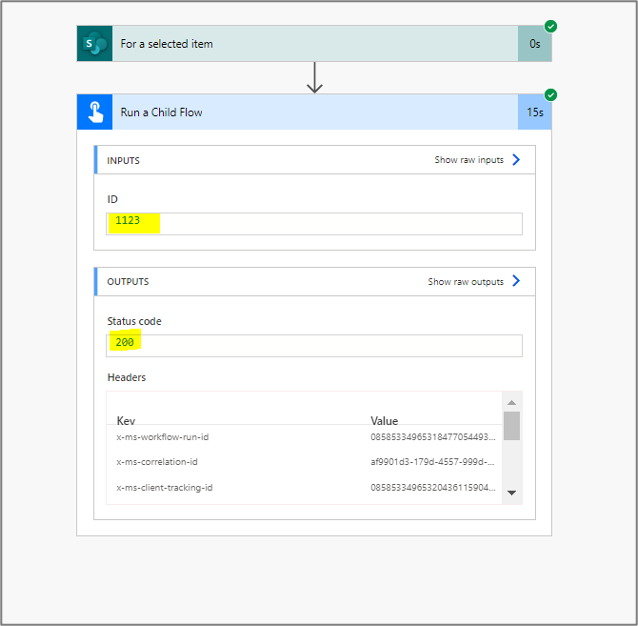
The Child flow received the request and in first action set the ID to 1123. Then the Child flow continues its work with this ID and finally sends the status code 200 as a successful code to the Parent flow through the “Response” action:
Finally, what we expected from the flows is done. In this process, by using the “Update Item” action, I filled the “Print File” column with the PDF file link that generated by the Child flow, and the user can view the file by clicking on the link.
If you have any questions, please leave a comment.